In a nutshell
- 🧲 Uses friction and tension from a simple rubber band to stabilise frames, acting like a non‑slip washer and adding gentle counter‑torque to keep pictures plumb.
- 🧰 Quick method: wrap a band under a nail head for sawtooth hangers, use a figure‑of‑eight tether for wire‑hung frames, and add rubber corner bumpers for extra wall grip—100% tool‑free and reversible.
- 🧠 Physics made practical: corrects tilt by opposing the frame’s rotational torque and boosting the coefficient of friction; elastic force self‑adjusts after bumps; choose latex, silicone, or hair ties to balance grip and longevity.
- 🚦 Know the limits: for heavy or oversized pieces, switch to D‑rings, proper wall anchors, or a French cleat; replace perished bands and avoid overstraining weak hardware.
- 📝 Handy reference: match problem to placement (drifting sawtooth, low wire side, smooth wall slip) and, for rentals or fresh paint, pair light tension with discreet Command strips for belt‑and‑braces stability.
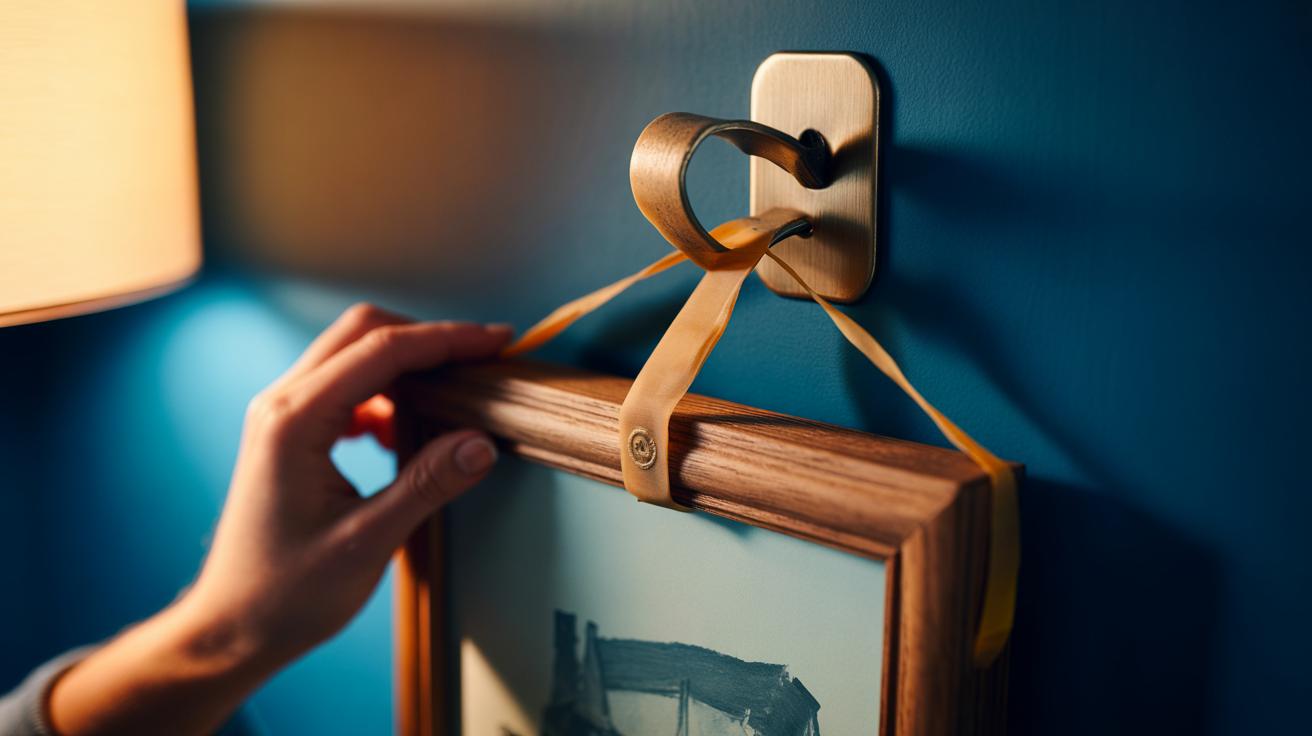
Every home has one: the picture that insists on tilting no matter how often you nudge it straight. The quick cure doesn’t require a spirit level, a toolbox, or a stern voice. It’s a humble rubber band. When used cleverly, the band adds tension and friction exactly where a frame loses its grip, creating a small but decisive counterforce that keeps art aligned. This is a five‑minute fix you can do between boiling the kettle and making tea. From sawtooth hangers that drift to wire‑hung frames that list to one side, this little loop of latex solves a surprisingly wide range of wonk. Here’s how it works, why it’s safe, and when to choose a sturdier solution.
Why Rubber Bands Straighten Wonky Frames
A tilting frame is almost always a balance problem. Gravity wins because the contact point between the hanger and the hook, or between the frame’s back and the wall, lacks enough grip to resist minute nudges, floor vibrations, or closing doors. A rubber band solves two issues in one move. It increases friction at the hanger so the frame stops skating on smooth metal, and it introduces tension that counters the twist causing the tilt. Add a little elastic force and the frame behaves as if it were hung on a rougher, more precise surface.
Think of it as tuning a guitar string. The band’s stretch provides a self‑adjusting pull that redistributes load across the frame’s hanging points. On a sawtooth hanger, a band wrapped around the nail head gives a grippy pad that locks the teeth in place. With wire‑hung frames, a loop tethered from the hanging wire to a corner staple creates a gentle counter‑torque that squares everything up. This isn’t brute force. It’s micro‑engineering for the living room, using elasticity to match the frame’s tiny imbalances and keep the picture plumb.
A Step-By-Step Fix You Can Do in Seconds
For sawtooth or keyhole hangers: 1) Remove the frame. 2) Wrap a rubber band tightly around the nail or screw shaft so a small cushion sits beneath the head. 3) Rehang the frame, seating the hanger against the rubber. 4) Nudge straight. You’ll feel the grip. The band acts like a built‑in non‑slip washer that stops drift on polished metal. For wire‑hung frames: 1) Twist a band into a figure‑of‑eight. 2) Slip one loop onto the wall hook alongside the wire. 3) Pull the free loop towards the low corner on the back and hook it over a staple, D‑ring, or the frame lip. Add twists to shorten, remove twists to lengthen, until the frame sits square.
Need more wall grip? Create two tiny bumpers: cut a band, tape a 2–3 cm strip to each lower back corner so the rubber just kisses the wall. The extra friction stops skating on painted plaster. Select a band that’s snug, not strained. If it looks chalky or perished, replace it. For painted walls, check for latex allergies and avoid direct contact if necessary by placing a sliver of paper under any band touching the wall. It’s all reversible, quiet, and blissfully tool‑free.
| Problem | Rubber Band Placement | Why It Works |
|---|---|---|
| Sawtooth drifts sideways | Around nail/screw under the head | Adds friction so teeth bite and hold |
| Wire frame hangs low on one side | Figure‑of‑eight: hook + low corner | Introduces tension and counter‑torque to square the frame |
| Frame skates on smooth wall | Short rubber strips on bottom corners | Creates non‑slip contact points |
Understanding the Physics: Tension, Friction, and Torque
Frames tilt because their centre of mass doesn’t sit directly beneath the hanging point once they’re bumped or a floorboard flexes. The resulting torque rotates the frame until friction runs out. The elastic in a rubber band intervenes at two stages. First, it raises the coefficient of friction at the contact surface, so small lateral forces fail to budge the hanger. Second, in a tether setup, it creates a restoring tension that pulls the lower corner into alignment, countering the rotational moment that produces tilt. Small tension applied at the right distance from the hook delivers big stability.
Because elastic force scales with stretch, the system self‑corrects. A slight knock lengthens the band by a millimetre or two, briefly increasing the pull until equilibrium returns. That’s why the fix feels reliable even when doors slam. Material matters, though. Natural latex grips brilliantly but degrades in sunlight; silicone bands are stable but less grippy; hair ties offer a plush, paint‑friendly contact patch. In practice, the trade‑off is simple: choose the band that delivers enough friction to stop slip and enough tension to oppose torque, without overstraining the frame’s hardware.
When to Skip the Hack and Use Hardware
Elastic is clever, not magical. If your frame weighs more than 7–8 kg, spans over a metre, or is glazed with thick glass, step up to proper wall anchors, two‑point D‑rings, or a French cleat. Plasterboard with unknown fixings? Don’t risk it. Heavy art deserves hardware designed to carry the load safely and predictably. The band hack also isn’t a cure for badly placed hooks, bowed backing boards, or warped timber. If the frame rails aren’t square, no amount of elastic will teach physics new tricks.
Use common sense cues. If the rubber band must be stretched to its limit to achieve level, you’re masking a bigger problem: move the hook, add a second hanger, or fit a rail. Watch for heat and sunlight, which age bands quickly; replace at the first sign of cracking. On rental walls or fresh paint, test a tiny patch to ensure no marking occurs; a discreet Command strip tab beneath each lower corner can partner with the band for belt‑and‑braces stability. The goal is simple: safe, straight, and easily reversible.
A wonky frame is annoying, not existential, yet sorting it out brings a quiet satisfaction to a room. The rubber band trick leverages tension and friction to deliver order without tools, noise, or cost, and it scales from postcards to sizeable posters. In minutes, you replace constant fiddling with a set‑and‑forget solution. Try it on one picture, then walk the hallway and rescue the rest. Keep a small stash of bands in the drawer for seasonal swaps and new prints. What artwork in your home could you straighten today with nothing more than a simple loop of elastic?
Did you like it?4.5/5 (22)