In a nutshell
- 🔧 The cause of squeaks is movement between the subfloor and joists or tongue-and-groove boards rubbing; lubricants only mask noise—screws provide a permanent fix.
- 🧩 The low-cost trick: drive trim-head wood screws into joists and add PVA wood glue where gaps exist; pre-drill pilots, countersink lightly, and map services first.
- 🏠 Variations for any room: lift carpet edges, work from a cellar with shims and adhesive, or angle fine #6 screws through the tongue on period boards—keep interventions reversible.
- 💷 Minimal kit and spend: screws, PVA, drill, and a stud finder—often under a fiver per room’s worst spots, with clear UK cost guidance in the article.
- ✅ Quick checks and pitfalls: confirm a joist squeak with upward pressure, use talc only as a diagnostic, avoid overdriving, missing joists, or striking hidden pipes and cables.
Creaky floors are the soundtrack of British homes, equal parts charming and maddening. They whisper at midnight, shout under guests, and betray every stealthy step. Here’s the good news: the fix isn’t pricey, and it isn’t complicated. The low-cost trick is to eliminate movement between timber layers with well-placed wood screws and, where needed, a dab of PVA wood glue. No gimmicks. No contractor call-out. Just a few pounds’ worth of hardware and a steady hand. Stop the movement, stop the noise—permanently. Done right, this method outlasts powders and sprays, respects period floors, and brings calm back to every corridor and landing.
Why Floors Squeak—and How to Stop Them
Most squeaks come from friction. The subfloor lifts a fraction from the joist and rubs. Or two tongue-and-groove edges fret against each other. Nails flex, seasonally, with humidity and load. Each step becomes a tiny violin bow across timber. The cure is not to lubricate but to clamp. Talc might hush for a week. So will silicone spray. Then the song returns. Only fastening the layers together provides a lasting cure. Screws beat nails because their threads draw wood tight and resist withdrawal over time, especially in older houses where boards have shrunk and fixings are sparse.
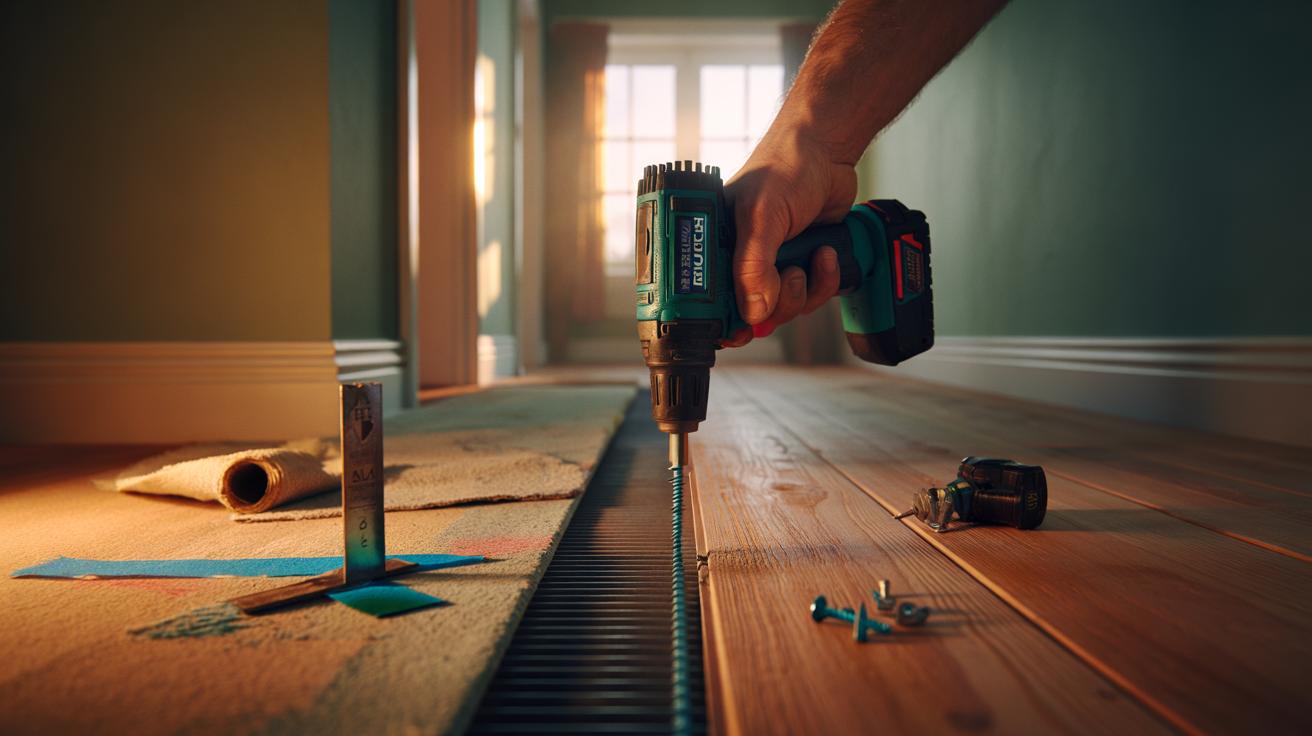
The low-cost trick is brutally simple: replace movement with compression. Drive trim-head or countersunk wood screws through the noisy board into the joist below. Add a line of PVA wood glue if you discover a visible gap, or a thin wood shim bedded in glue from below if there’s a cellar. The principle never changes. You’re converting a loose sandwich into a single, quiet unit. One caveat: map services before drilling. Pipes and cables love to run parallel to joists, particularly near radiators and under hallway spurs.
The £5 Screw-and-Glue Method, Step by Step
Find the squeak. Walk slowly, heel to toe, marking suspect spots with masking tape. Tap the floor to trace the joist line; a stud finder helps, but percussion and a thin nail test through a gap between boards work too. Once a joist is confirmed, pre-drill a 2–3 mm pilot at a slight angle. This prevents splitting and guides the screw into solid timber. Choose #8 (4–4.5 mm) trim-head screws, 50–60 mm long for boards, 60–70 mm for chipboard over deep joists. Drive two screws per squeak, spaced 40–60 mm apart, then a third if needed. Do not use nails—they flex and the noise returns.
If you can see daylight or feel bounce, inject PVA wood glue into the seam first. Step on the area like a clamp while driving the screws to bed the layers tight. Countersink heads fractionally; hide them with wax filler or a matching stopper on exposed boards. On engineered floors, stay near the joist line or tongue, not the middle of the board. For delicate period timber, go slow and test depth so you never break through. Expect five minutes per squeak. The cost? A few screws and a drizzle of glue. The result? Silence.
Under Carpet, From Below, and Other Variations
Carpeted rooms aren’t a deal-breaker. If possible, lift a corner, fold back along the skirting, and work on the exposed subfloor before refitting to the gripper. It’s quicker than you think and saves buying special breakaway screws. Mark joists, drill pilots, and drive countersunk screws through the chipboard into joists exactly as you would on bare floors. No access from above? Head below. In houses with a cellar or crawl space, press the subfloor tight to the joist with a prop, then either add construction adhesive along the seam and a thin wood shim where the gap is persistent, or drive 35–45 mm screws up from the joist into the subfloor.
Old, nail-fixed boards often squeak along the tongue. Work just into the shoulder of the board above the tongue and drive a fine #6 screw at 15 degrees toward the joist. It locks the joint invisibly. Avoid edges near pipes, especially by radiators and bathrooms; a non-contact voltage tester and careful inspection of notches and holes through joists are essential. If you can’t verify a joist or service run, don’t drill. For listed interiors, keep interventions reversible: screws rather than adhesives, and always document locations for future repairs.
Tools, Costs, and Quick Checks
Everything you need fits in a tote. Most DIYers already own half of it. Here’s a snapshot of the essentials and typical UK prices, showing how the “permanent fix” really is a low-cost trick.
| Item | Purpose | Typical UK Cost |
|---|---|---|
| Trim-head wood screws (#8 x 50–60 mm) | Clamp subfloor/boards to joists | £3–£6 per 100 |
| PVA wood glue | Bond loose seams or shims | £3–£7 per bottle |
| Drill + 2–3 mm bits | Create pilots, avoid splitting | £0 if owned / £20–£50 |
| Stud finder or tapping nail | Locate joists accurately | £0–£15 |
| Wax filler/stopper | Hide countersunk heads | £4–£8 |
Two quick checks before you start: first, confirm it’s a joist squeak by stepping while someone below pushes the subfloor up with a stick—if the sound fades, you’ve found the interface. Second, test the talc myth; if it stops the noise briefly, you’ve confirmed friction, not structural failure. Then fix it properly with screws. Screws create a permanent mechanical lock; lubricants merely mask friction. Common pitfalls include missing the joist, overdriving and crushing fibres, or striking a hidden pipe. Work methodically, mark lines clearly, and you’ll finish a room in an hour.
You don’t need specialist kits, just a method that replaces flex with grip. Tighten the sandwich—board, adhesive where necessary, joist—and the symphony of squeaks goes silent. It’s cheap, fast, and reversible on heritage floors if you plan screw positions and fill neatly. The real win is peace: stairs that stop shouting, landings that don’t confess your midnight snack. Ready to map your first joist line, charge the drill, and try the £5 screw-and-glue cure on the loudest spot in your home, or will you start with a discreet test under the bed?
Did you like it?4.7/5 (27)