In a nutshell
- 🧵 A £0 DIY thermal curtain cuts heat loss by taming conduction, convection, and radiant heat; it’s renter‑friendly, reversible, and built from household scraps.
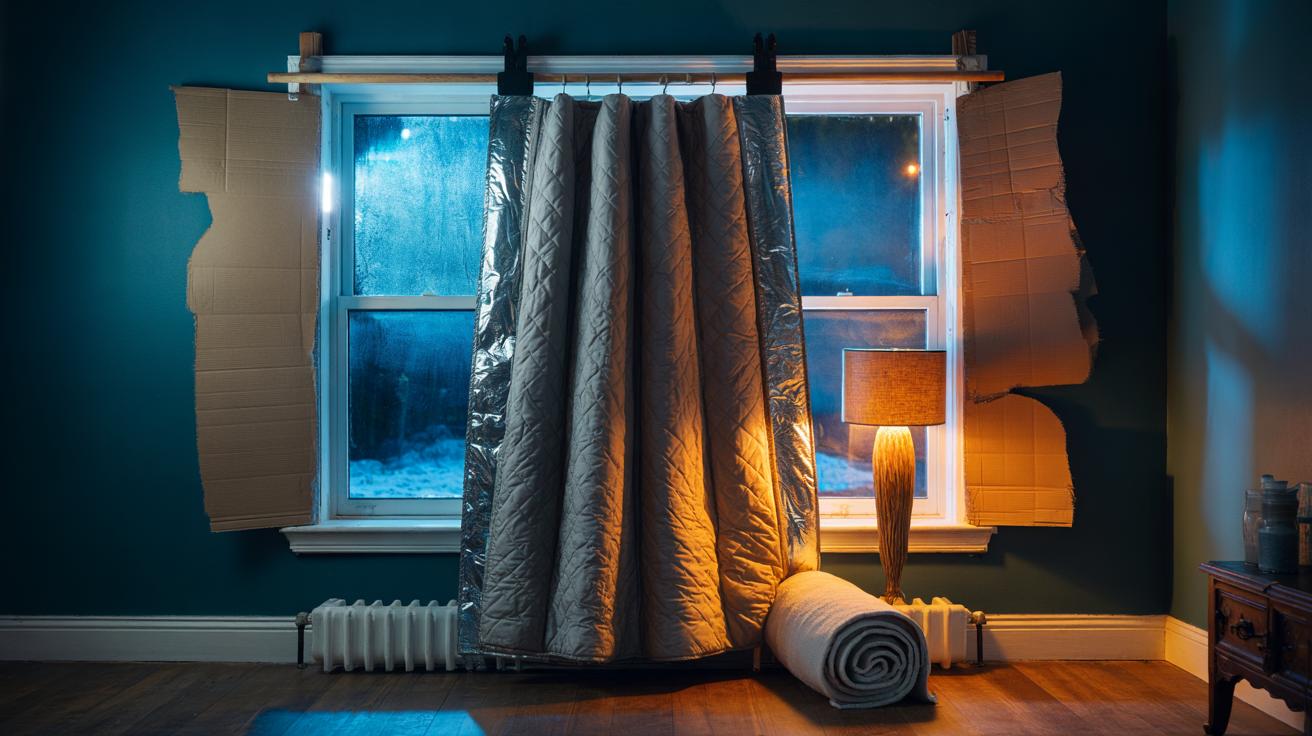
- 🧰 Use a duvet/blanket, cardboard, aluminium foil or shiny packaging for a reflective layer, clips/pegs, and a towel for a draught seal; aim for airtight edges rather than aesthetics.
- 🛠️ Rig it fast: hang to the floor, overlap sides, stiffen with cardboard wings, add foil facing the room, and seal the bottom with a towel; test with tissue/torch for leaks and ventilate daily to manage condensation.
- ⚠️ Keep fabric clear of heaters; never cover vents, flues, or detectors; watch dew point moisture and wipe panes; ensure quick release for exits—this is a stopgap, not a substitute for proper insulation.
- ➕ Stack gains: lay rugs on bare boards, move sofas off external walls, use door snakes, pair blinds with curtains, add radiator foil with an air gap, and seal letterbox/keyhole to reduce whole‑house draughts.
Winter bites harder when the cost of warmth climbs. Yet there’s a zero-euro fix hiding in plain sight: a DIY thermal curtain built from things you already own. Think spare duvet, moving blankets, cardboard, and shiny packaging. No drilling. No shopping. Just smart layering that stops draughts, slows convection, and bounces back radiant heat. In under an hour, you can tame that icy bay window or leaky back door and feel rooms stabilise. The trick is simple physics, not magic. And it works whether you rent, house-share, or own. This is a temporary, reversible barrier that lifts comfort at zero cost—and it might be the most satisfying tweak you make all winter.
Why This Zero-Cost Thermal Curtain Works
Heat escapes three ways: conduction through glass and frames, convection from cold air tumbling off windows, and radiation to the night sky. Your homemade thermal curtain tackles all three. The fabric layer creates a still-air pocket that behaves like a cheap extra pane; the bottom seal halts that sneaky river of cold air across the floor; and a simple reflective layer—foil from a food packet or metallised gift wrap—faces the room and bounces warmth back. It’s the same principle as survival blankets and professional low-e films, just improvised.
Deploy it at night when losses spike. In old British homes with single glazing, the perceived temperature near windows can feel several degrees lower. Stop the downdraught and you stop the shiver. That calmer air also makes your radiator’s job easier because it’s no longer fighting a constant cold cascade. Do not drape fabric over radiators, heaters, or open flames. Keep a hand’s width gap above heat sources so warm air can circulate into the room, not get trapped behind cloth.
What You Need From Around the House
You’re aiming to create a layered barrier that’s heavy enough to hang straight, sealed at the edges, and slightly reflective. A spare duvet or thick curtain does the heavy lifting. Cardboard from delivery boxes stiffens the top or edges. A strip of aluminium foil or shiny snack packaging (clean and dry) adds the radiant shield. Use bulldog clips, clothes pegs, or hairbands to fasten. A towel or old scarf becomes a bottom seal. A broom handle, tension pole, or existing curtain pole provides the ridge to hang from. If you’ve got none, tie a length of string between two solid points for a makeshift pelmet.
The goal is not beauty; it’s airtightness and simplicity. Work with what you’ve got. Layer, then seal. If your window faces a busy street, consider a dark outer layer to improve privacy and reduce glare. Always leave trickle ventilation in kitchens and bathrooms to manage moisture. A good DIY is one you can remove in seconds if conditions change.
| Item | Free Substitute | Purpose | Safety Note |
|---|---|---|---|
| Duvet/Blanket | Spare curtain, heavy throw | Thermal mass and air pocket | Keep clear of heat sources |
| Aluminium Foil | Shiny snack bag, gift wrap | Reflect radiant heat | Use clean, dry material |
| Cardboard | Rigid packaging | Edge stiffener, pelmet | Don’t block escape routes |
| Towels/Scarves | Rolled T-shirts | Draught seal at floor | Avoid tripping hazards |
Step-by-Step: Rig, Seal, and Test
First, map the cold zone. Stand by the window at night; feel for a chill river around your ankles. That’s your target. Hang a broom handle or line just above the frame. Clip your duvet so it falls to the floor, overlapping the wall by a few centimetres each side. If edges flare, tape or clip cardboard strips along the sides to act as wings that press against the wall. Now tape a strip of foil to the room-facing side at chest height—shiny outwards—to reflect warmth. Finish with a rolled towel at the base to block the draught.
Testing matters. Hold a strip of tissue at the edges; if it flutters, improve the seal. A phone torch behind the curtain helps you spot gaps. You want stillness. In the morning, fold the curtain back to ventilate and let light in. If condensation appears on glass, wipe it down and slightly loosen the bottom seal overnight next time. This setup should install and remove in under a minute once you’ve built it. Fast, quiet, effective.
Safety, Moisture, and Common Mistakes
Heat and fabric are uneasy partners. Keep your thermal curtain clear of radiators, gas fires, and cookers. Never cover vents, flues, or detectors. Moisture is the other enemy. Warm rooms meeting cold panes can push indoor air past the dew point, fogging glass and, over time, inviting mould. Control it: crack a window after showers, use lids when boiling, and open the curtain daily to dry the reveal. If a window is already damp or mouldy, clean it first and consider a thin spacer (string or tape “buttons”) so fabric doesn’t press against wet surfaces.
Common mistakes are easy to fix. A curtain that stops short of the floor invites a sneaky underflow—extend it or add that towel snake. Gappy sides? Stiffen with cardboard wings. No shine? Even a small reflective patch helps on bitter nights. Blocking an escape route is a red line; your setup must pull back fast. Finally, remember the scope: this is a stopgap, not a substitute for proper insulation. It buys comfort and cuts loss while you plan longer-term improvements.
Bonus Gains With What You Already Own
Stacking small wins multiplies warmth. Move sofas 10 cm off external walls to reduce conductive chill on your back. Lay spare rugs over bare boards—especially above unheated spaces—to tame floor draughts. Roll towels along door thresholds at night and close off rooms you’re not using; you’re heating air, not the hallway. Post slot whistling? Tape a temporary cardboard flap inside or wedge a lightweight book for the evening. Keyhole breeze? A blob of reusable putty works wonders after dark.
Hot water bottles warm people, not rooms, but they spin the comfort maths in your favour. Radiator foil behind external-wall rads can help too; use packaging-grade foil with a safe air gap, never pressed onto electrics or gas. And if you’ve got blinds plus curtains, run both: blinds for the near-pane still air, curtains for bulk. The theme is simple: slow moving air, reflect heat, seal leaks, and keep it reversible. Your zero-euro kit is already in the house—use it.
When the mercury drops, control and comfort come from small, clever barriers you can build in minutes. This zero-euro thermal curtain turns scraps into shelter, easing the bite of long nights and shrugging off that wicked floor chill. It won’t replace insulation, but it will change how your room feels, right now, for nothing. Try it tonight, test, tweak, and teach a neighbour. What corners of your home are crying out for a quick, no-spend warmth fix—and which inventive materials will you press into service first?
Did you like it?4.6/5 (29)