In a nutshell
- ✨ A quick vinegar wipe brings dull tiles back to life as acetic acid dissolves alkaline film and light limescale for a crisp, streak-free shine.
- 🧴 Use correct dilution ratios (e.g., 1:10 routine; 1:4 heavy) and test first; never on natural stone to avoid etching or damage.
- 🧽 Switch to a microfibre spray-and-wipe method with minimal moisture, add a warm dwell time of 2–5 minutes, and finish with a thorough dry buff.
- 🍳 For kitchen grime, pre-treat with a pH-neutral degreaser, rinse, then apply a vinegar finish; do not mix with bleach or ammonia—separate steps safely.
- 💧 Tackle hard-water spots using a 10–15 minute vinegar compress, agitate gently, rinse, and dry; consistent drying and a weekly barrier spray extend the shine.
When your tiles look flat and lifeless, a simple vinegar wipe can restore the sparkle faster than most pricey sprays. The secret is chemistry: the acetic acid in vinegar dissolves the alkaline films left by soap, hard water and everyday grime, cutting through residue that dulls ceramic and porcelain. It’s thrifty, quick and friendly to most sealed surfaces. But it’s also precise. Use the right dilution, the right tool, and a light touch. Never on marble or other acid-sensitive stone. Below, five quick swaps that turn a sluggish mop routine into a sharp, streak-free clean — and explain exactly how this gentle acid makes tiles pop again.
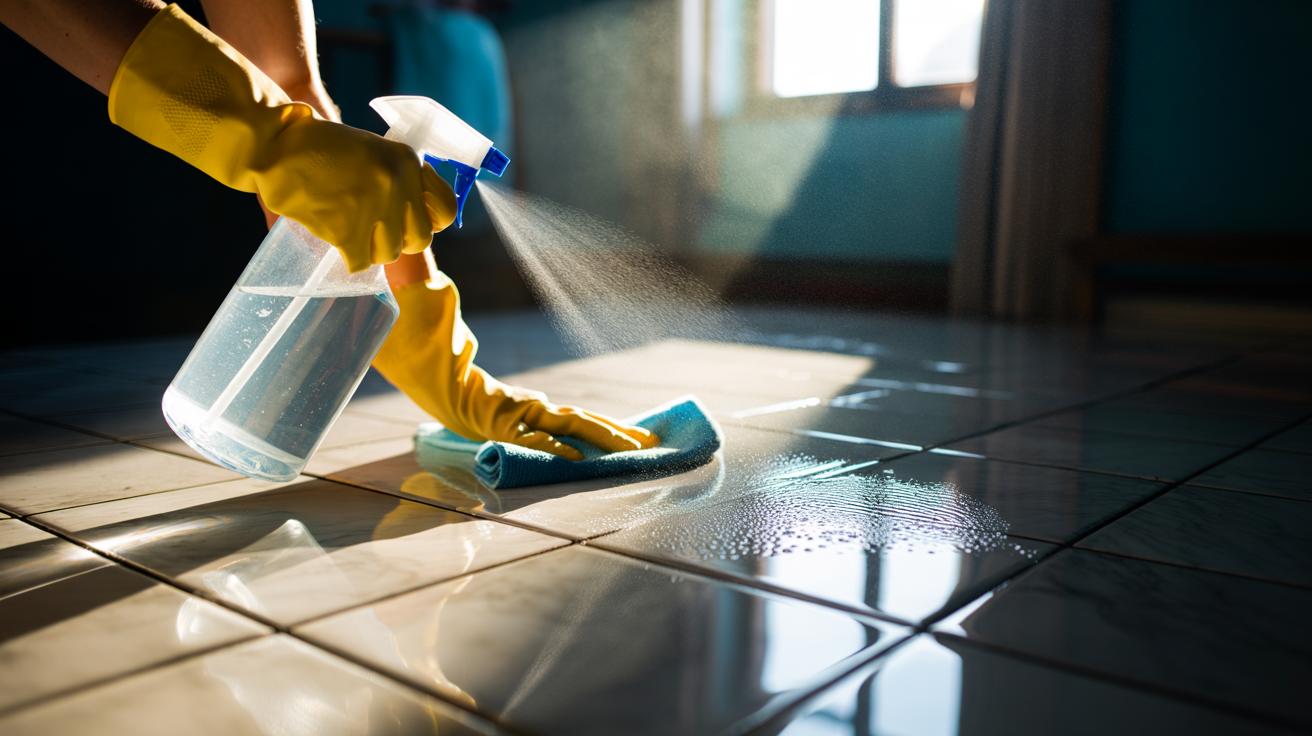
Swap 1: Choose Diluted White Vinegar Over Soapy Floor Cleaner
Soapy cleaners often leave a film. That film grabs dust, scatters light and makes tiles look tired within hours. Acetic acid in white vinegar tackles what soap leaves behind. It dissolves alkaline residues and disrupts mineral bonds in light limescale, so the surface reflects evenly again. Mix household vinegar (5% acetic acid) with warm water. For routine shines, a mild ratio preserves finishes while still cutting haze.
Always test in a hidden spot first and avoid unsealed or acid-sensitive surfaces. Apply lightly with a well-wrung microfibre pad, then dry-buff. Because vinegar is volatile, it flashes off quickly, which helps prevent streaks if you don’t over-wet the floor.
| Surface | Vinegar:Water | Notes |
|---|---|---|
| Ceramic/Porcelain tiles | 1:4 (heavy), 1:10 (routine) | Wring pad well; dry after |
| Sealed vinyl/laminate | 1:10 | Light mist only; no pooling |
| Textured tiles | 1:4 | Allow brief dwell, then agitate |
| Natural stone (marble, travertine) | Do not use | Acid can etch stone |
| Sealed encaustic/cement | 1:10 | Patch test; keep brief |
Swap 2: Spray-and-Wipe Microfibre, Not Bucket Sloshing
Trade the sloshy mop for a spray-and-wipe routine. Fill a trigger bottle with your chosen dilution. Lightly mist the floor, work in small sections, and glide a flat microfibre pad across the tile. Microfibre’s split fibres grab residue electrostatically, while the vinegar breaks down the alkaline component of the film. You’ll use less liquid, so there’s less chance of water creeping into grout lines and spreading dirt back out again.
Do not flood grout; keep moisture controlled. For stubborn traffic lanes, step up pressure rather than liquid. Follow with a dry, clean cloth to buff. That final dry pass matters: it removes loosened residue and aligns the sheen, giving you that crisp, reflective finish without streaks. Spray-and-wipe also suits vertical bathroom tiles, where running water carries soap scum down the wall and leaves a grey cast across the grout.
Swap 3: Warm the Vinegar and Let It Dwell
Speed comes from smart contact time. Slightly warmed solution (hand-hot, not boiling) cleans faster because heat accelerates diffusion and helps the acid-base reaction along the film. Mist the area, then give it two to five minutes to work. On shower walls, that short dwell softens soap scum — a mix of fatty acids and minerals — so it slides off with one pass.
Never let vinegar dry on the surface; keep it active and then wipe away. Re-mist lightly if it starts to flash off. Ventilate the room, and avoid metal trims if they’re not corrosion-resistant. Vinegar is an excellent deodoriser for musty grout and drains, but it isn’t a hospital-grade disinfectant. If you require sanitising, clean first with vinegar to remove soil, then use a suitable sanitiser according to the label after the surface is dry. Separation of steps prevents chemical conflicts and preserves clarity.
Swap 4: Ditch Abrasive Powders for a Neutral Degrease, Then a Vinegar Finish
Kitchen tiles often look dull not from minerals but from grease. Abrasive powders or stiff scourers can haze glazes and wear the shine. Instead, pre-clean greasy patches with a pH-neutral degreaser or a drop of washing-up liquid in warm water to lift oils without scratching. Rinse or wipe with clean water to remove surfactants. Then deliver the vinegar pass to strip the last alkaline traces and neutralise any hard-water streaks left by the rinse.
This two-step keeps friction low yet finishes glossy. Never mix vinegar directly with bleach, ammonia or chlorine-based products; separate tasks with a clear-water rinse and time. If your grout is sound but stained, apply the degreaser with a soft brush, wipe away the soil, and complete with a controlled vinegar wipe across tile faces to restore reflectivity. The result: a floor that feels clean underfoot and looks crisp from skirting to threshold, without scratching your way there.
Swap 5: Treat Hard-Water Spots With a Vinegar Compress and a Dry Buff
Hard-water minerals anchor themselves to tile and glass, scattering light and creating a chalky veil. A simple compress cuts through. Soak folded paper towels or a microfibre cloth in diluted vinegar, press onto the stained area, and leave for 10–15 minutes. The acetic acid chelates calcium and magnesium, loosening scale so it wipes away without heavy scrubbing. On vertical shower tiles, work from the top down to stop dissolved minerals re-depositing lower down.
Remove the compress, agitate with a non-scratch pad, then rinse thoroughly and dry-buff. Drying is the secret to a lasting shine. It prevents fresh droplets from evaporating and re-planting minerals. Finish by polishing metal fixtures separately, and apply a light, tile-safe barrier spray weekly to slow future build-up. The compress method replaces harsh descalers for routine maintenance and brings back the crisp, even gleam that makes grout lines pop.
These five swaps lean on one principle: let a mild acid do the heavy lifting, then remove it cleanly. You save time, avoid residue and coax a richer shine from humble ceramic or porcelain. Be strict about the rules: test first, use the right dilution, and keep vinegar away from natural stone. With a light mist, a patient dwell and a final buff, dull tiles shift from cloudy to crystal clear in minutes. Which swap will you try first on your own floors and walls, and what kind of tile are you tackling?
Did you like it?4.6/5 (23)