In a nutshell
- 🧠 A simple rubber band loop increases contact area and static friction, converting more effort into usable torque for instant, controlled lid release.
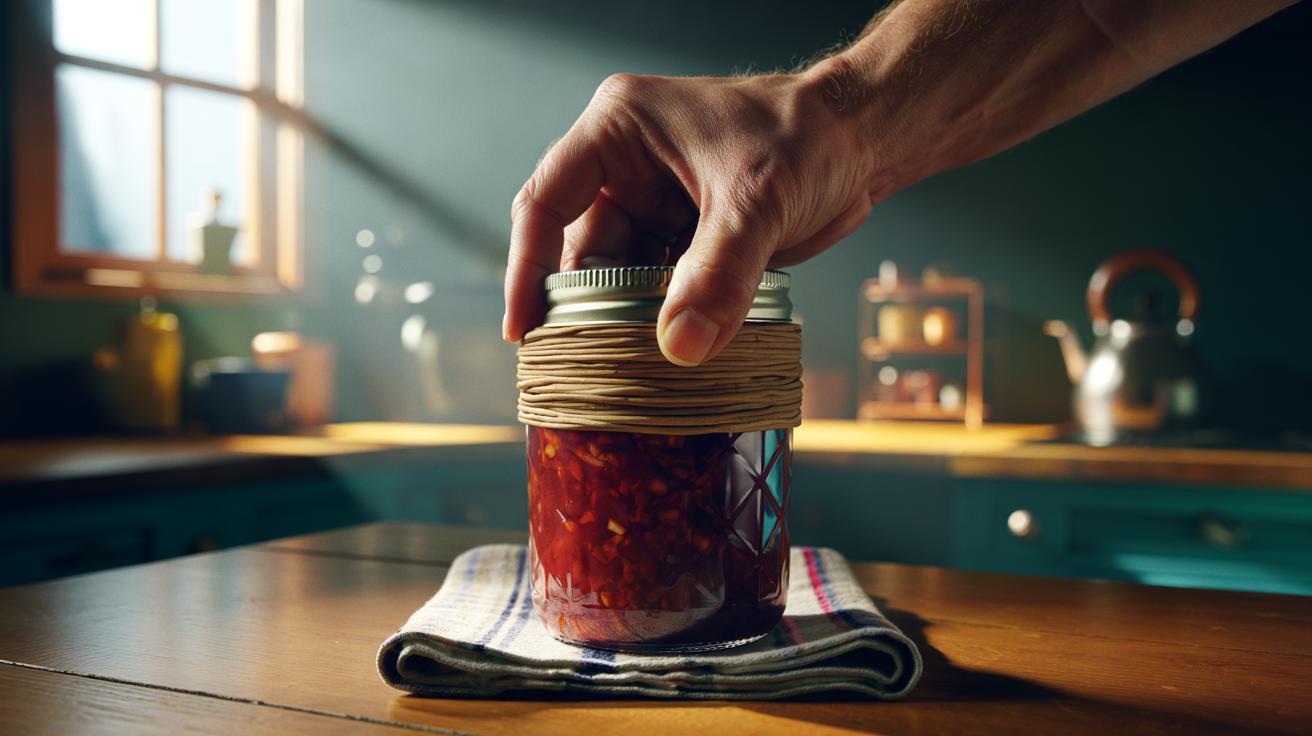
- 🛠️ Step-by-step: choose a wide band (1–2 cm), dry lid and hands, seat it on the rim corrugations, apply a steady twist, and use a crossed double loop for extra tread-like grip.
- 🧤 Safety and ergonomics: stabilise the jar with a towel or hip, avoid tapping lids, dry surfaces before twisting, and remember “Friction first, leverage second, force last.”
- 📊 Methods at a glance: single band (moderate gain), crossed double loop (high gain), and band + tea towel base (high gain) for slick lids and large jars.
- 🧓 Accessibility hacks: for sensitive or arthritic hands, trap a spoon handle under the band as a lever; retire perished bands—fresh rubber grips, old rubber slips.
It looks like kitchen alchemy, yet the explanation is satisfyingly practical. Wrap a humble rubber band around a stubborn lid, and suddenly the jar that mocked your wrists yields with a sharp pop. The trick lies in a simple loop that tames slippage, multiplies grip, and transfers your effort into turning force. From pickled onions to artisanal chutneys, British cupboards are full of lids sealed by vacuum and varnished by oil. A rubber band defeats both at once. What begins as a budget hack quickly becomes a habit, because the method is fast, tidy, and repeatable. Here’s why the surprise awaits, and how to make the most of it.
Why a Simple Loop Transforms Grip
A bare hand on a glazed lid is a losing contest against physics. Your skin has limited friction, especially when the metal rim is slick with brine or oil. A rubber band loop changes the equation. It increases the real contact area by deforming into the lid’s micro-grooves, then resists motion with a higher static friction. That first millimetre of no-slip is everything. Once the seal breaks, the effort plunges. The loop also cushions finger pressure, so you can squeeze harder without pain, making your twist steadier rather than frantic.
There’s more happening than stickiness. Rubber stores a fraction of your squeeze as elastic energy. As you twist, that stored energy steadies the motion in tiny pulses, smoothing torque delivery through the sticky points. On painted lids, the band prevents the “polished ice” effect that happens after repeated attempts. Instead of polishing, you’re gripping. Add a second loop and cross it over, and you gain a rudimentary tread that behaves like a tyre on a wet road. That tread sheds surface moisture sideways, keeping the interface dry under pressure.
Then there’s force path. Without the band, your skin pulls unevenly, creating hot spots that slip first. The loop equalises load around the circumference, so more of your effort converts into useful torque. The result is a calm, controlled twist instead of a red-faced wrestle. Small change, big mechanical win.
Step-by-Step: The Rubber Band Jar Opener
Start simple. Choose a broad, flat rubber band about 1–2 cm wide. Wider bands spread pressure and bite better. Dry the lid and your hands. Moisture kills friction fast. Stretch the band and seat it around the lid’s outer rim, not the smooth top. You want the corrugations. Pull it taut so it lies flat without buckles. If the band is thin, double it to form a thicker loop. Hold the jar against your hip or a tea towel on the counter to stabilise the base without crushing the glass.
Now grip the banded rim with your dominant hand, thumb on top, fingers hooked under the rim’s edge through the rubber. Twist steadily, not explosively. Think controlled pressure, two seconds of increasing force. You should feel the seal ease, then a clean give. If it resists, stop and reposition the band so fresh rubber meets fresh metal; rotate the jar rather than your wrist to keep alignment. For extra leverage, add a second loop crossed into an “X”, creating a raised ridge you can lock onto.
| Method | Extra Kit | Estimated Torque Gain | Best For |
|---|---|---|---|
| Single wide band | None | Moderate | New lids, light vacuum |
| Crossed double loop | Second band | High | Slick or painted lids |
| Band + tea towel base | Tea towel | High | Large jars needing stability |
If your hands are sensitive or arthritic, use the loop with a short length of wooden spoon as a lever: trap the spoon handle under the band and twist gently, keeping the jar anchored. Leverage plus friction beats brute force. Retire any cracked or perished bands; fresh rubber grips, old rubber slips.
Science and Safety: Friction, Torque, and Fit
Rubber’s magic lies in a high static friction coefficient against common lid finishes. Dry rubber on painted steel can feel near Velcro-like, while rubber on bare chrome is still markedly grippier than skin. Add the compliant nature of rubber and you gain micro-interlocking across ridges and paint orange-peel. The outcome is a bigger frictional ceiling before slip, which translates into more usable torque from the same wrist effort. Friction first, leverage second, force last—that’s the safe order of operations in the kitchen.
Fit matters. A band that’s too loose rides up; too tight may pinch and roll. Aim for snug, covering at least a third of the rim’s height. If your jar has a tall shoulder, shift the band lower so your fingers can hook under. Pairing the loop with stabilisation multiplies the effect: pin the base with a damp cloth to stop counter skidding, or use the soft shelf-liner many households keep for drawers. These surfaces add bottom-side friction, preventing loss of effort to the jar spinning.
Safety is as important as physics. Never twist with wet, soapy hands. Glass can shatter if you squeeze the body while torquing hard, so hug it gently against your hip or a towel rather than clamping with fingertips. Avoid the old “tap the lid on the counter” habit; it dents seals and risks glass microfractures. Heat is a last resort: a brief run under warm water can soften the seal, but always dry before applying the rubber band loop. If you regularly struggle, consider a purpose-made gripper; the rubber trick is brilliant, but the right tool can spare wrists in the long run.
What begins as a cupboard hack ends up a mini masterclass in everyday engineering. By adding a compliant layer, you increase friction, stabilise torque, and turn a battle into a smooth, confident twist. A single loop delivers instant, repeatable grip. It’s cheap, tidy, and sits invisibly in a drawer until the next obstinate lid appears. Keep a couple of wide bands clipped to your spice rack and you’ll never chase a jar around the counter again. Which other simple, overlooked objects in your kitchen could be upgraded into quiet problem-solvers with a touch of ingenuity?
Did you like it?4.7/5 (30)